Last week we discussed basic outlines, really more of a way to explore backstory and get a feel of your world and characters than a “true” plot-based outline.
This week, we’ll get into more plot-focused outlining methods. Again, I’ll include examples, and please feel free to ask for clarification on anything.
Also, remember that outlining works for YOU, not the other way around, and it is perfectly fine to use a combination or modify a method to make it be what you need it to be. (I often use a combination of the freewriting from last week with the phase outlining we are about to discuss if I don’t do a more formal outline.)
(Actually I recommend the freewriting method with any of the following methods, because it really is a great way to help develop your world and characters before you try to figure out what’s happening when.)
Phase (and Note card)
Phase outlining is pretty straightforward. You start at the beginning and go all the way through to the end, making a basic list of scenes with one or two sentence bullet points. (Or sentence fragments. This process is not picky.) This allows you to have a basic complete plot from the beginning, but also allows for a lot of wiggle room when it comes to other key story elements, such as themes, characterization, structure, etc. Note card outlining is similar. In note card outlining, you put each scene on its own card as opposed to listing the whole thing on a single piece of paper. The advantage of note card outlining is that it’s easy to rearrange scenes later on if you find that things end up making more sense in another order. It’s also easier to add and remove scenes as necessary.
Example:
- Anna gets another memory while in History
- School is not great because rumors about her and Tom in the waterworks have spread (Which is not great because if word gets back to the Council it’ll be suspicious)
- Tom, Anna, and Charlie meet at Tom’s after school (Charlie is “dating” Maesie)
- All have information to bring to the table–Tom has his map of the Waterworks, Anna has her experience within the Hospital, and Charlie has his experience from the war
- They still have a lot of blank spots though–what is the Town’s relationship, what are they getting?
Or, for note card outlining:
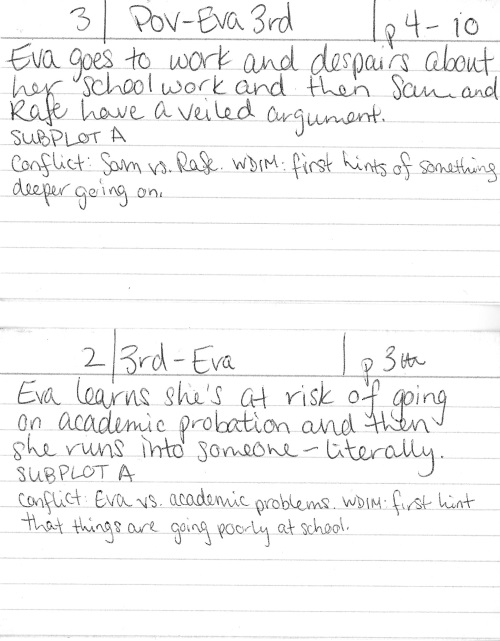
(I use note card outlining primarily for revision, as a way to see what I have vs. what I need, so there’s more information on my cards than is strictly necessary.)
Both of these methods are good for determining what’s going to happen and in what order. Points/cards can be specific (“Amy’s dig finds success–she finds a series of broken pottery shards with strange symbols on them”) or vague (“They have an argument”). And both are changeable–as I mentioned above, you can rearrange your note cards or add new ones (or take ones out), and you can always cross out a section of your phase outline and add something else in instead.
(I actually like to phase outline in chunks. I typically phase outline up to a point, normally the next major plot point, write to that point, and then outline again to the next point. I find it too hard to map out every move for an entire novel, so this helps me, and it helps with my pacing too.)
Reverse
Reverse outlining isn’t a specific technique so much as a twist that can be used in conjuction with a number of other outlining techniques. Basically, with reverse outlining, you just start at the end instead of the beginning. Some people feel like, if they know where they’re trying to get, they can better plan out the beginning part of a story.
Example (paired with freewriting):
Okay, so at the end of the book, I want my main character to have been captured by the opposing army. Why did they capture her? She made a mistake. Doing what? A mission behind enemy lines. To get something. A powerful artifact that the other side is using against her people. If she gets it, it will turn the tide of the war. Why was she chosen for this mission? There was a team. What happened to the rest of the team? One by one, they all fell.
Tentpole
In tentpole outlining, you identify the three main “tentpoles,” or defining moments, of your story, before you start writing. These three are typically the inciting incident, the midpoint, and the climax (terminology varies). This is a pretty technical way to outline and focuses a lot on pacing and story structure. The idea is that by knowing what needs to happen at a specific point, you can have an idea of where you need to be at any point in time in terms of rising/falling action and plot progression.
Example:
First Tent Pole: First sabotage attempt (or first that can be obviously tied to sabotage); arrive at projected coordinates–no ship
Midpoint: Ship nearly suffers from fatal sabotage attempt; discovery of scorched debris
Second Tent Pole: Saboteur gets cocky, starts leaving clues; faint signal detected
It can be helpful to make sure your tentpoles for each of your arcs or subplots. I typically do my external arc, my internal arc, and an relational arc (characters’ relationships with other characters). I find the method works best if you have a general idea of how long the book is going to be, since your tentpoles happen at specific points in a story (the first plot point occurs about 25% in, the midpoint about 50% in, etc.). And while you’re not tying yourself down by having to plot out every scene, you know what you’re working toward and when you need to get there.
Act
Act outlining is similar to tentpole outlining, but a little more in depth. Typically act outlining includes more plot points that tentpole outlining, and it includes a summary or phase outlining in between each plot point, so it provides a more detail look at plot progression and where the story needs to be at different places.
A lot of outlines for this method tend to do six acts rather than the three tentpoles. I like Michael Hauge’s take on this form, and have used it a few times for my novels (you can see it explained in detail at his website).
STAGE I: The Setup
TURNING POINT #1: The Opportunity (10%)
STAGE 2: The New Situation
TURNING POINT #2: The Change of Plans (25%)
STAGE III: Progress
TURNING POINT #3: The Point of No Return (50%)
STAGE IV: Complications and Higher Stakes
TURNING POINT #4: The Major Setback (75%)
STAGE V: The Final Push
TURNING POINT #5: The Climax (90-99%)
STAGE VI: The Aftermath
This was originally developed for screenplays, but works well for novels as well. Both this and the tentpole method can be a good compromise for people who worry that an outline will kill their creativity. You’ll know where you’re going, but won’t have to know how you’re getting there.
Next week we’ll look at more structured methods of outlining.